Drywall is used to create beautiful interior walls and ceilings. Also known as plasterboard and sheetrock, drywall is made from calcium sulfate dehydrate, which is found in fertilizer, sidewalk chalk, and, of course, gypsum.
 The old construction saying “measure twice, cut once” is especially important when working with Drywall Las Vegas. The following guide on the proper installation of drywall will help you avoid costly mistakes.
Drywall Fasteners
Drywall is an extremely versatile material that can be used to create interior walls and ceilings. When a project calls for the installation of drywall, it’s important to use the right fasteners to ensure that it stays in place without pulling away from the wall. It’s also important to space the fasteners properly to prevent sagging over time. The right fasteners will keep your drywall in good shape and help it resist damage from items being hung on the wall.
Studs are the most effective way to secure items to a wall, but if a stud isn’t available or you just want to use an alternative method, drywall anchors can be used. These plastic or metal devices distribute the weight of what you’re hanging onto the wall by expanding inside the drywall. They’re easy to install and rated for a variety of weights, making them a cost-efficient option.
Toggle bolts, often referred to as “butterfly” anchors, are the most heavy-duty type of drywall anchor. To use them, first, drill a hole that’s about three times larger than the anchor itself. Then, fold back the wings on the bolt’s end and insert it into the hole. The wings then open up to grip the back side of the drywall, distributing the weight and securing it in place. Toggle bolts are available in a variety of lengths, with thinner models offering lower holding capacities and thicker versions holding more weight.
For most standard drywall anchors, simply mark where you plan to put the bolt or screw and then use a drill to create the pilot hole. You’ll need a drill bit that’s the same size as or slightly smaller than the anchor’s head. Some anchors come with their drill bits, while others require you to buy a separate set of bit sizes. You can find a drill bit measuring guide online or in most hardware stores.
When working with drywall anchors, be sure to use a drill that’s capable of spinning to avoid over-tightening the anchor and stripping the head. Next, place the drywall anchor into the pilot hole and use a screwdriver to tighten it. When tightening, apply firm pressure to ensure that the anchor doesn’t slip out of the drywall. If the anchor is pulling away from the wall, loosen it with a screwdriver and try again.
Tape
The next step is to apply a thin layer of drywall compound over the seams. This is called taping the drywall, and it’s often considered one of the most important steps in the drywall installation process. It hides the stud seams and joints and ensures that all fasteners are properly set. It also creates a smooth surface that will be easy to paint. For most do-it-yourselfers, this is the hardest part of the entire project because it’s time-consuming and requires a high level of skill. But with the right materials and techniques, you can make this portion of your renovation go a lot more smoothly.
Drywall tape comes in a wide variety of types and colors, but it’s essential to choose the best type for your particular project. You can use paper tape or fiberglass tape, depending on the job. Fiberglass tape is more durable and less prone to damage, but it can be expensive. Paper tape is cheaper and works well for most projects. The most important thing is that the tape you choose adheres to the drywall and seals all edges of the joint.
Using a drywall knife, spread the first coat of compound along the seams and into the corners. Let it dry according to the recommended amount of time on the compound’s container.
Many DIYers skip this step or don’t do it very well, and it’s one of the main reasons their drywall projects fail. Skipping the tape and simply using a thick layer of mud over the seams will result in unsightly bumps and bubbles that mar the finished wall surface.
When you’re ready to apply the next layer of drywall compound, use a drywall knife to smooth it over the tape, just like you did with the first coat. Some people prefer to apply both layers at the same time, but if you do this, be careful not to press too hard with your knife as this can cause the tape to shift or wrinkle.
Some experts recommend wetting the paper tape before applying it, which helps to minimize problems such as ripples or creases. It’s not necessary, but it makes the tape more pliable and traps fewer air bubbles behind it.
Skim Coat
A drywall skim coat is a crucial step that helps hide seams, dents, and other imperfections that are left behind after drywall installation. This layer of compound is applied almost like paint and dries to a smooth surface that’s ready for painting or wallpaper. For homeowners who want to tackle their drywall work, skim coating can be a great DIY project that saves money by not hiring a professional. However, a few things need to be kept in mind to ensure the best results when learning how to skim-coat drywall.
Adding a skim coat to existing drywall is a fast and inexpensive way to make walls ready for painting or other wall coverings. This process is particularly important for old drywall that may have many small holes and rough areas or if the drywall has been installed over a different type of material, such as wood framing.
The best time to skim coat is after the mud has been sanded but before the final sanding of the drywall surface. It’s also a good idea to do this before you prime the walls. This will help the primer adhere better and prevent any flaws or discoloration that can occur during the priming process.
It’s also a good idea to lay down drop cloths and cover the floor before starting to skim coat. This will protect the floors from the drywall compound and help to contain the dust in one area of the room. It’s also a good idea for homeowners to turn off the electrical circuits and remove outlet and switch covers in the room they’re working in.
To begin the skim coating process, pour a light layer of premixed joint compound, also known as drywall mud, into a paint tray and spread it over the wall surface in vertical sections, about three to five feet at a time. You can use a trowel, drywall knife, or spatula to smooth the compound, working slowly and with steady pressure.
Once the first layer of skim coat is complete, let it dry completely. Repeat this step until the wall is as smooth as desired, making sure each subsequent application dries fully before sanding. When the last coat of skim coat is applied, it’s important to feather the edges of the compound with a sanding block to create a smooth transition between the compound and the original drywall surface.
Finish
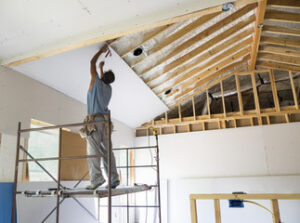
Drywall is now the standard in most residential construction and it is very important to know who you are hiring for a drywall project. It is much more than just the product that matters, it is also how it is installed and finished. A skilled drywall professional will know the proper techniques for hanging, trimming, and finishing a wall or ceiling, as well as what types of materials are needed for each job.
Proper drywall installation starts by measuring each sheet to ensure it will fit correctly. A drywall square and utility knife are essential tools. If you are installing a wall that will be very long, it is a good idea to cut the sheets down to size before starting. This will save time and money.
When cutting a piece of drywall, place it on a flat surface and mark the necessary length with a pencil or a T-square. A utility knife can then be used to score the drywall along the marked line. This will cause the drywall to break cleanly. It is a good idea to use a corner bead to complete any corners as this will give the walls and ceiling a more professional finish.
Once the drywall has been cut to size, it should be carefully placed on the framing members and secured with bugle head screws that are 12″-16″ apart. This will help prevent drywall from cracking or pulling away from the framing. If possible, a drywall installer should avoid putting pressure on the screw head to avoid breaking the drywall or creating a larger hole for patching later.
When drywall is being installed in a building that is under construction, it is important to keep in mind that temperature and humidity will affect how fast the joint compound dries. It is a good idea to keep temporary heating and ventilation running during the installation and finishing processes to speed up the drying times and help reduce moisture problems.
Another important drywall installation tip is to never line up a seam with the frame of a wall opening. This can not only result in wasted drywall, but it will make spackling more difficult and promote cracking of the drywall down the road.