Home » Articles posted by Frances Sanchez
Author Archives: Frances Sanchez
A Guide On The Proper Installation Of Drywall
Drywall is used to create beautiful interior walls and ceilings. Also known as plasterboard and sheetrock, drywall is made from calcium sulfate dehydrate, which is found in fertilizer, sidewalk chalk, and, of course, gypsum.
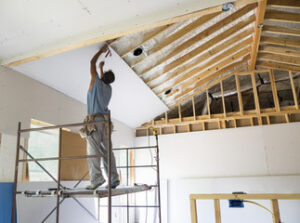 The old construction saying “measure twice, cut once” is especially important when working with Drywall Las Vegas. The following guide on the proper installation of drywall will help you avoid costly mistakes.
Drywall Fasteners
Drywall is an extremely versatile material that can be used to create interior walls and ceilings. When a project calls for the installation of drywall, it’s important to use the right fasteners to ensure that it stays in place without pulling away from the wall. It’s also important to space the fasteners properly to prevent sagging over time. The right fasteners will keep your drywall in good shape and help it resist damage from items being hung on the wall.
Studs are the most effective way to secure items to a wall, but if a stud isn’t available or you just want to use an alternative method, drywall anchors can be used. These plastic or metal devices distribute the weight of what you’re hanging onto the wall by expanding inside the drywall. They’re easy to install and rated for a variety of weights, making them a cost-efficient option.
Toggle bolts, often referred to as “butterfly” anchors, are the most heavy-duty type of drywall anchor. To use them, first, drill a hole that’s about three times larger than the anchor itself. Then, fold back the wings on the bolt’s end and insert it into the hole. The wings then open up to grip the back side of the drywall, distributing the weight and securing it in place. Toggle bolts are available in a variety of lengths, with thinner models offering lower holding capacities and thicker versions holding more weight.
For most standard drywall anchors, simply mark where you plan to put the bolt or screw and then use a drill to create the pilot hole. You’ll need a drill bit that’s the same size as or slightly smaller than the anchor’s head. Some anchors come with their drill bits, while others require you to buy a separate set of bit sizes. You can find a drill bit measuring guide online or in most hardware stores.
When working with drywall anchors, be sure to use a drill that’s capable of spinning to avoid over-tightening the anchor and stripping the head. Next, place the drywall anchor into the pilot hole and use a screwdriver to tighten it. When tightening, apply firm pressure to ensure that the anchor doesn’t slip out of the drywall. If the anchor is pulling away from the wall, loosen it with a screwdriver and try again.
Tape
The next step is to apply a thin layer of drywall compound over the seams. This is called taping the drywall, and it’s often considered one of the most important steps in the drywall installation process. It hides the stud seams and joints and ensures that all fasteners are properly set. It also creates a smooth surface that will be easy to paint. For most do-it-yourselfers, this is the hardest part of the entire project because it’s time-consuming and requires a high level of skill. But with the right materials and techniques, you can make this portion of your renovation go a lot more smoothly.
Drywall tape comes in a wide variety of types and colors, but it’s essential to choose the best type for your particular project. You can use paper tape or fiberglass tape, depending on the job. Fiberglass tape is more durable and less prone to damage, but it can be expensive. Paper tape is cheaper and works well for most projects. The most important thing is that the tape you choose adheres to the drywall and seals all edges of the joint.
Using a drywall knife, spread the first coat of compound along the seams and into the corners. Let it dry according to the recommended amount of time on the compound’s container.
Many DIYers skip this step or don’t do it very well, and it’s one of the main reasons their drywall projects fail. Skipping the tape and simply using a thick layer of mud over the seams will result in unsightly bumps and bubbles that mar the finished wall surface.
When you’re ready to apply the next layer of drywall compound, use a drywall knife to smooth it over the tape, just like you did with the first coat. Some people prefer to apply both layers at the same time, but if you do this, be careful not to press too hard with your knife as this can cause the tape to shift or wrinkle.
Some experts recommend wetting the paper tape before applying it, which helps to minimize problems such as ripples or creases. It’s not necessary, but it makes the tape more pliable and traps fewer air bubbles behind it.
Skim Coat
A drywall skim coat is a crucial step that helps hide seams, dents, and other imperfections that are left behind after drywall installation. This layer of compound is applied almost like paint and dries to a smooth surface that’s ready for painting or wallpaper. For homeowners who want to tackle their drywall work, skim coating can be a great DIY project that saves money by not hiring a professional. However, a few things need to be kept in mind to ensure the best results when learning how to skim-coat drywall.
Adding a skim coat to existing drywall is a fast and inexpensive way to make walls ready for painting or other wall coverings. This process is particularly important for old drywall that may have many small holes and rough areas or if the drywall has been installed over a different type of material, such as wood framing.
The best time to skim coat is after the mud has been sanded but before the final sanding of the drywall surface. It’s also a good idea to do this before you prime the walls. This will help the primer adhere better and prevent any flaws or discoloration that can occur during the priming process.
It’s also a good idea to lay down drop cloths and cover the floor before starting to skim coat. This will protect the floors from the drywall compound and help to contain the dust in one area of the room. It’s also a good idea for homeowners to turn off the electrical circuits and remove outlet and switch covers in the room they’re working in.
To begin the skim coating process, pour a light layer of premixed joint compound, also known as drywall mud, into a paint tray and spread it over the wall surface in vertical sections, about three to five feet at a time. You can use a trowel, drywall knife, or spatula to smooth the compound, working slowly and with steady pressure.
Once the first layer of skim coat is complete, let it dry completely. Repeat this step until the wall is as smooth as desired, making sure each subsequent application dries fully before sanding. When the last coat of skim coat is applied, it’s important to feather the edges of the compound with a sanding block to create a smooth transition between the compound and the original drywall surface.
Finish
Drywall is now the standard in most residential construction and it is very important to know who you are hiring for a drywall project. It is much more than just the product that matters, it is also how it is installed and finished. A skilled drywall professional will know the proper techniques for hanging, trimming, and finishing a wall or ceiling, as well as what types of materials are needed for each job.
Proper drywall installation starts by measuring each sheet to ensure it will fit correctly. A drywall square and utility knife are essential tools. If you are installing a wall that will be very long, it is a good idea to cut the sheets down to size before starting. This will save time and money.
When cutting a piece of drywall, place it on a flat surface and mark the necessary length with a pencil or a T-square. A utility knife can then be used to score the drywall along the marked line. This will cause the drywall to break cleanly. It is a good idea to use a corner bead to complete any corners as this will give the walls and ceiling a more professional finish.
Once the drywall has been cut to size, it should be carefully placed on the framing members and secured with bugle head screws that are 12″-16″ apart. This will help prevent drywall from cracking or pulling away from the framing. If possible, a drywall installer should avoid putting pressure on the screw head to avoid breaking the drywall or creating a larger hole for patching later.
When drywall is being installed in a building that is under construction, it is important to keep in mind that temperature and humidity will affect how fast the joint compound dries. It is a good idea to keep temporary heating and ventilation running during the installation and finishing processes to speed up the drying times and help reduce moisture problems.
Another important drywall installation tip is to never line up a seam with the frame of a wall opening. This can not only result in wasted drywall, but it will make spackling more difficult and promote cracking of the drywall down the road.
The Importance of Site Preparation for Concrete Contractors
You know the popular saying, “Walk a mile in their shoes?” Well, for concrete contractors, that could not be more true. Commercial Concrete Contractors Dallas TX handle various tasks for large-scale construction projects. They pour, place, and finish specified mass, pavement and flat concrete work.
 Choosing the right contractor can save you time and money in the long run. Look for a contractor that has a friendly demeanor, answers questions promptly and professionally, and provides quotes in a timely manner.
Site preparation is one of the most important steps in building construction. It sets the stage for the rest of the project and helps to reduce damage to the structure later on. It also increases the lifespan of a building.
The process of site preparation involves a variety of tasks, including grading and clearing the land. It can also include demolition, excavation and utility installation. This work is necessary for a new building to have a solid foundation and provide access to utilities. It’s also important to remove any obstructions that could hinder the construction process, such as trees, boulders and debris.
Another part of the site preparation process is soil testing. This can help to indicate what type of soil is on the property and if it’s suitable for the building. This step is especially important if the construction will involve heavy equipment. The soil should be able to support the weight of the equipment and any other buildings that may be constructed on it in the future.
Once the site has been prepared, it’s time to start building! Construction should begin as soon as possible. This will help to ensure that the project is completed on time and without any problems. It will also help to prevent any costly reworks that may result from poor site preparation.
Whether you’re building a commercial office, retail space, apartment complex or a home, proper site preparation is key to the success of your construction. By taking the time to prepare the site before construction starts, you can save yourself a lot of money and headache down the road.
Whether you need site clearing, demolition, excavation, grading, or utility installation services, JHC has you covered. Our team of professionals has experience with residential, commercial, and industrial projects. We can handle any project, large or small. So contact us today to learn more about our site prep and excavation services! We’ll work with you to find the solution that suits your needs. We’re dedicated to providing quality, cost-effective service for all of our customers. We look forward to hearing from you!
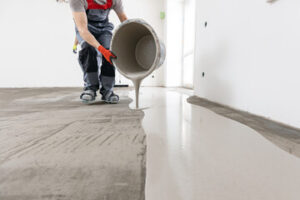
Pouring the Concrete
Before concrete is poured, it’s important to check that the area is safe and legal for a pour. This includes contacting the local building department to learn about setbacks, permits and any other requirements. It also involves calling the local “call before you dig” number to have pipes and wires marked before starting construction.
Once the site is ready, clear away any objects or materials that would interfere with the concrete pouring process. This may include grass, rocks, trees, shrubs and old concrete. Clearing the area also helps reduce the chance of heaving caused by expansive soils and frost.
Depending on the project, it may be necessary to lay a sub base of gravel or compact the soil with a hand or plate compactor. Creating a firm surface will help prevent heaving and cracking of the new concrete slab.
If the concrete is being poured onsite, the first step is to have wheelbarrows and helpers on standby. After the concrete is poured, use a long plank of wood to smooth it. This is called screeding and it’s done by jiggling the board back and forth over the concrete until it’s level and smooth.
Before the concrete sets, it’s important to protect it with tarps and ropes to keep it clean. It’s typically safe to walk on a new concrete slab after a day or two and safe for vehicles to drive on after about a week.
It’s important to choose the right type of concrete for your project. Some projects require a high strength concrete, while others benefit from a lightweight aggregate. If you’re unsure of what to choose, consult with a professional concrete contractor. They can give you advice based on the specific project and location and recommend what is best for your needs. It’s also a good idea to discuss any extras you may want, such as coloring or special finishes. These can add a lot to the final cost of the concrete. Choosing the right concrete can significantly increase your finished product’s quality and value.
Sealing the Concrete
Concrete may be one of the strongest materials around your home, but that doesn’t mean it’s impervious to damage. Its porous nature means it easily absorbs moisture, which in turn can lead to cracking, staining, and discoloration if the moisture doesn’t dry completely. Sealing your concrete helps prevent this damage and will ensure it looks good for a long time.
There are many different types of sealers on the market, and each offers its own benefits. Film forming sealers create a coating over the surface of the concrete, which offers protection and a slight sheen without changing the appearance of the concrete. These sealers are breathable, and need to be reapplied every 3 – 10 years.
Penetrating sealers work differently, absorbing into the concrete to form a chemical barrier. These products offer a natural look to the concrete, and are breathable as well, allowing vapors to escape. These sealers are commonly used on outdoor concrete and need resealing after 5 years of service.
It’s important to understand the concrete and its environment before deciding on a type of sealer. If you choose the wrong product, it can cause the concrete to crack or even degrade. It’s also essential to take the time to clean the concrete before applying the sealer. The concrete must be free of dirt, grime, and oil. It’s best to hire a professional to complete this task, but it can be done by a skilled DIYer.
The most important step in this process is ensuring that the concrete is dry before starting. A damp concrete surface will not adhere to the sealer and can damage it. It’s also a good idea to wear protective gloves, long sleeves and pants, and glasses. The sealer will contain chemicals that are harmful to your skin and eyes, so it’s important to follow the instructions on the label for proper precautionary measures.
Once the concrete is sealed, regular maintenance will keep it looking good for a long time. Simple cleaning every few months with soap and water will help the sealer last. If you notice that your concrete is fading, or has any other issues, contact us and we can put you in touch with a professional tradesman to get it repaired and resealed.
Maintenance
Working with concrete requires a certain level of expertise. A good concrete contractor can help you get a quality finished product that will last for years to come, and they can also provide insight into proper maintenance procedures to extend the lifespan of your concrete structure. They should have experience working with concrete and should be licensed and insured. It is also a good idea to check customer testimonials and references prior to hiring a concrete contractor for your project.
A concrete contractor will use a variety of tools and techniques to create your concrete structure. Formwork is a key part of this process, and it allows the concrete to take on different shapes and designs. This can be used in a number of ways, from creating steps and ramps to adding decorative elements to your structure. Concrete contractors will also use a variety of forms to keep the concrete in place as it cures.
As the concrete sets, it will start to shrink. This is a natural part of the process, but it can cause problems. If the concrete shrinks too much, it will lose its strength and durability. A concrete contractor will know how to prevent this from happening by properly mixing the concrete and using accurate measurements.
Another important part of the job is to monitor the progress of the concrete as it cures. This is done by taking pictures and other data that can be accessed through software programs. This allows the concrete contractor to ensure that the construction crew is following the project timeline correctly. It can also help them identify any mistakes that may lead to additional costs down the road.
In addition to monitoring the concrete as it cures, concrete contractors will also be responsible for performing routine maintenance on existing structures. This includes repairing cracks and other damage. They can also perform concrete leveling, which is a process of drilling holes into the surface and filling them with a cement mixture to make the area flat again. This is a less expensive option than replacing the entire sidewalk, and it is also considered environmentally friendly.
Selecting the Right Air Filtration and Heating Service Champions for Your Homes
Air filtration is a method of filtering the air you breathe in. A filter captures unwanted particles such as dust, pollen, pet dander, dirt, and bacteria from the air. In addition, air filters capture tiny particles that may be too large to pass through standard filters. Clearwater Filtration purifies the air and reduces the carbon footprint in the household.

There are many types of air filtration units available for your home or office. You should select one based on the size of the room or office where you intend to install it. For example, if you have a large room or office where you perform many tasks, you will probably need a larger unit than you would if your space is small. Units come in a variety of styles, colors, and functions. Before purchasing an indoor unit, check with your manufacturer or dealer to find out which models are appropriate for the room or office you plan to use it in.
Air purification systems use many of the same components as air cleaners. Air filters also function as air cleaners. These air purification systems work because airborne particles, such as dust, pollen, and bacteria, are trapped within the filters. They then become oxidized and fall out of the filters into a holding tank where they can remain until removed by the air purification system’s air cleaner. Air purifiers then pull the filtered air out of the tank into your room or office.
Air filters also remove other pollutants, such as smoke, mold, and pet dander. The dust and airborne particles are filtered in to be pumped back into the air stream, where they will once again become harmless. This process is continuous and will not stop until all of the pollutants have been removed. If you choose to install an air filtration unit in your home, you may want to consider purchasing a whole house filter. This will allow you to clean not only your living areas but also your windows and doors. These filters also generally clean better than an indoor air cleaner because the filters are more effective at removing dust and airborne particles throughout the home.
The health benefits of owning an air purifier are not limited to asthma and allergies. Many people suffer from sore throats, especially children and those with breathing difficulties due to issues such as allergies or asthma. While some of these pollutants are outside your control, many can be traced back to indoor pollution levels. Many people with respiratory issues find that switching to a higher-quality indoor air filter can help them breathe more easily. In addition to improving your respiratory health, you will also find that your allergies clear up, your eyes sparkle, and your skin is softer to the touch.
Many people also opt to install a cooling system for their homes. Whether you have an oil-filled cooling unit or a vapor compression device, replacing your existing cooling system can dramatically improve your home’s indoor air quality. Air conditioners work to keep the temperature at a constant level. Air filters help remove most of the pollutants found in the air, from pollen and mold spores to poisonous gases and odors. Keeping your cooling system running at peak performance will save you money on energy costs over time and increase the value of your home.
Some homeowners are hesitant to switch to an air conditioner or a cooling system because of the cost. Unfortunately, energy costs can be high in today’s economic environment. However, if you make some changes to your existing cooling system or appliance, you could significantly reduce your energy bill while keeping your home comfortable. For example, suppose your air conditioner or furnace doesn’t get clogged with debris. In that case, the filter will catch most of what it releases, thus allowing you to reduce the amount of filter replacement needed to keep your air conditioner running smoothly. Changing to an energy-star-rated heating and cooling system may also save you money, especially during these troubled economic times.
Many companies offer annual professional cleaning, including reverse osmosis, in addition to other services. You can do your service check by purchasing the latest technology, including HVAC Performance Data Pages (HDP), which measure performance based on specific criteria. Some of the criteria used are ozone control, UV light disinfection, and reverse osmosis. With the help of an experienced technician, you can choose one of these criteria to help you decide on the right service champion for your needs. Next, choose an air filtration or heating company that offers services that meet the criteria that you set for your HVAC needs.